How to program ESP32 to send messages using Meshtastic LoRa module
This guide guide will walk you through the steps to program an ESP32S3 to send messages through UART to a Meshtastic LoRa module.
Requirements
- ESP32S3 development board
- Meshtastic LoRa module (e.g., Heltec Wireless Stick Lite V3)
- USB-C cable
- Jumper wires
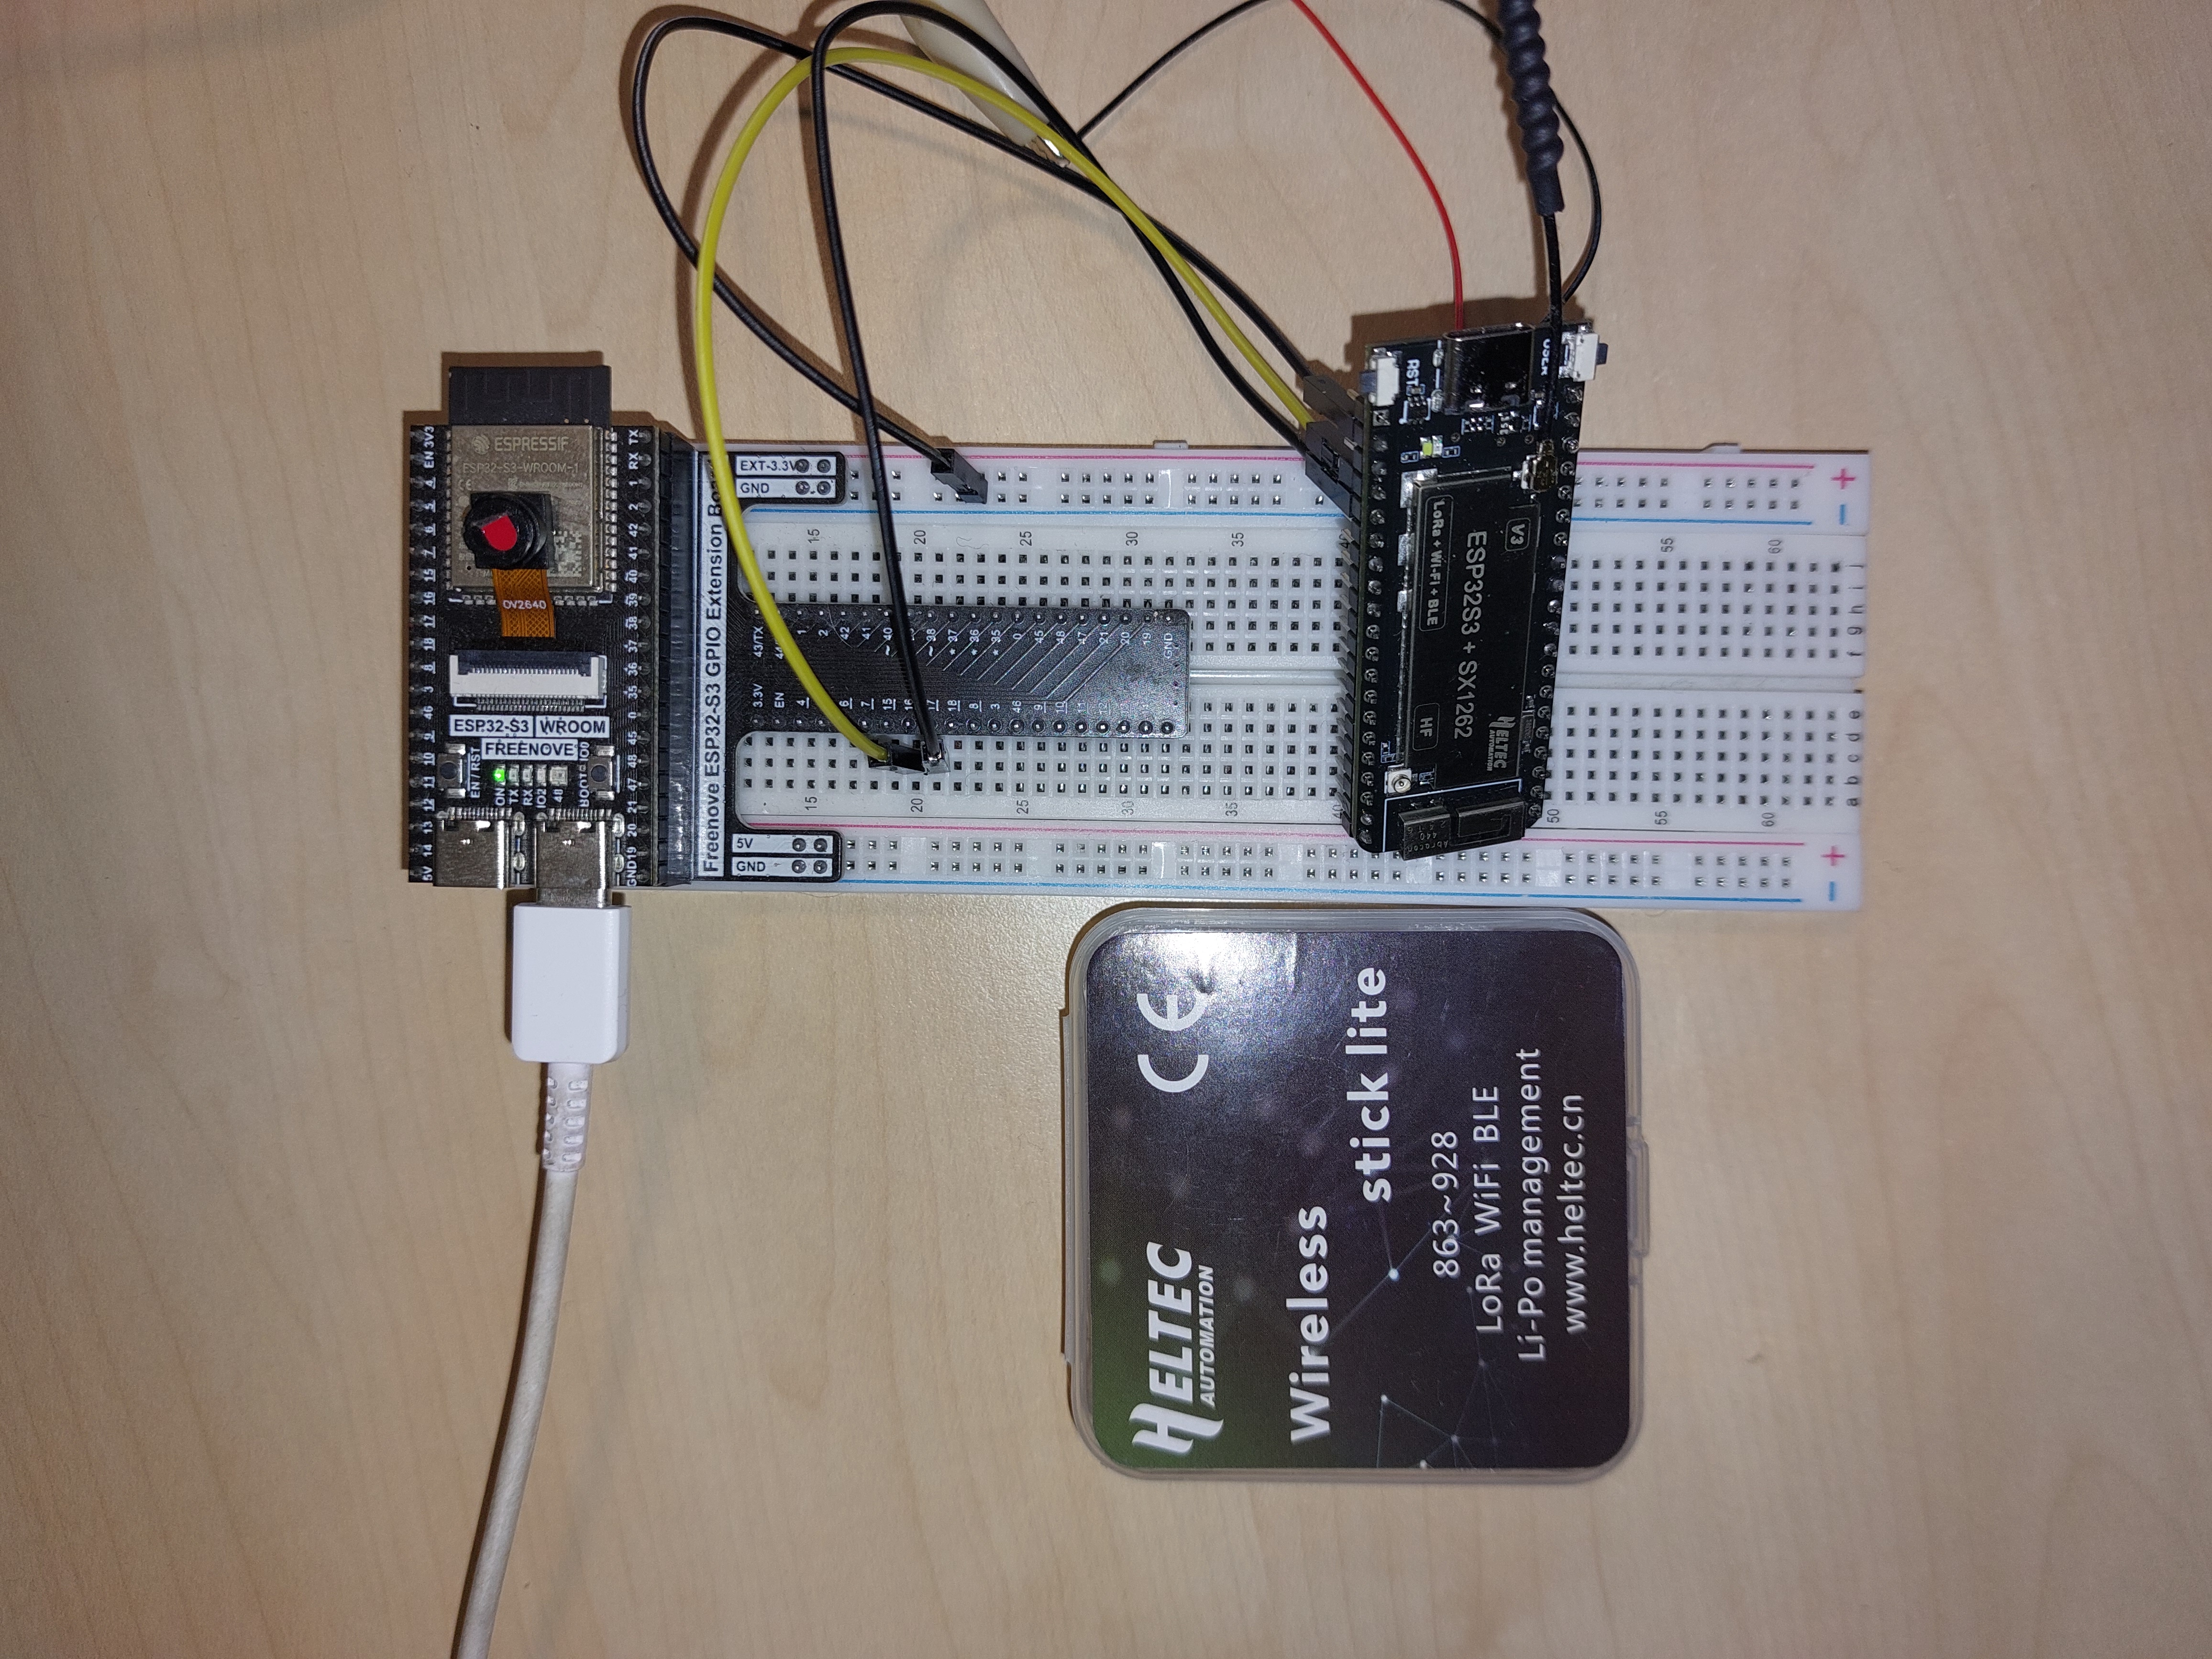
Wiring Connections
Connect the ESP32S3 to the Meshtastic LoRa module as follows:
- ESP32S3 GPIO16 (TX) --> Heltec GPIO44 (RX)
- ESP32S3 GPIO17 (RX) --> Heltec GPIO43 (TX)
- ESP32S3 GND --> Heltec GND
ESP32S3 connected with USB-C cable for power and programming. Heltec powered momentarily through external power supply or battery.
Programming the ESP32S3
In this example we will use microPython to program the ESP32S3. So make sure you have microPython firmware installed on your ESP32S3. Check out this guide if this is not done yet. To upload and run microPython code on the ESP32S3, we will use Thonny IDE.
microPython module for Meshtastic UART communication
Upload the following module to your ESP32S3 using Thonny IDE. This module will handle sending messages to the Meshtastic LoRa module via UART.
"""
Meshtastic UART Library voor MicroPython
=========================================

Deze module maakt het mogelijk om berichten te verzenden naar een Meshtastic
LoRa module via UART door correcte Protobuf berichten te construeren.

Auteur: WeerWijs Project
Datum: December 2025
"""

import struct
import urandom


# =============================================================================
# PROTOBUF ENCODING FUNCTIES
# =============================================================================
# Protocol Buffers (protobuf) is het binaire formaat dat Meshtastic gebruikt
# voor communicatie. Elk bericht bestaat uit field number + wire type + data.

def encode_varint(value):
    """
    Encode een integer als protobuf varint (variable-length integer).

    Varint encoding gebruikt 7 bits per byte voor data, en de 8e bit (MSB)
    geeft aan of er nog meer bytes volgen:
    - MSB = 1: Er volgen nog meer bytes
    - MSB = 0: Dit is de laatste byte

    Voorbeeld:
        300 (0x12C) wordt: 0xAC 0x02
        - Byte 1: 0xAC = 10101100 → data=0101100 (44), continue=1
        - Byte 2: 0x02 = 00000010 → data=0000010 (2), continue=0
        - Result: (2 << 7) + 44 = 256 + 44 = 300 ✓

    Args:
        value (int): Integer waarde om te encoderen (0 tot ~2^32)

    Returns:
        bytes: Geëncodeerde varint bytes
    """
    # Maak een bytearray voor de output. Een bytearray is een mutable bytes lijst.
    # We gebruiken bytearray omdat we dynamisch bytes gaan toevoegen.
    result = bytearray()

    # Zolang de waarde groter is dan 127 (past niet in 7 bits)
    while value > 0x7F:
        # Neem onderste 7 bits door masking met 0x7F (01111111)
        # en zet MSB op 1 (0x80 = 10000000)
        result.append((value & 0x7F) | 0x80)
        # Shift waarde 7 bits naar rechts voor volgende byte
        value >>= 7

    # Laatste byte: onderste 7 bits zonder continue-bit
    result.append(value & 0x7F)

    return bytes(result)


def encode_string(field_number, text):
    """
    Encode een string field voor protobuf.

    String encoding bestaat uit 3 delen:
    1. Header byte: (field_number << 3) | wire_type
       - Wire type 2 = length-delimited (voor strings, bytes, nested messages)
       - Wire type 2 betekent dat de data voorafgegaan wordt door een lengte (varint)
       - field_number is het nummer van het veld in de protobuf definitie (1-15 gebruiken 1 byte)
       Zie ook: https://developers.google.com/protocol-buffers/docs/encoding#structure
    2. Length: aantal bytes van de string data (als varint)
    3. Data: UTF-8 geëncodeerde string bytes

    Voorbeeld: field 2, text "hi"
        - Header: (2 << 3) | 2 = 16 + 2 = 18 = 0x12
        - Length: 2 (string is 2 bytes) = 0x02
        - Data: "hi" = 0x68 0x69
        - Result: 0x12 0x02 0x68 0x69

    Args:
        field_number (int): Protobuf field nummer (1-15 gebruiken 1 byte)
        text (str): String om te encoderen

    Returns:
        bytes: Header + length + UTF-8 data
    """
    # Converteer string naar UTF-8 bytes
    data = text.encode('utf-8')

    # Wire type 2 = length-delimited (strings, bytes, embedded messages)
    header = encode_varint((field_number << 3) | 2)

    # Length van de data als varint
    length = encode_varint(len(data))

    return header + length + data


def encode_uint32(field_number, value):
    """
    Encode een uint32 field als varint voor protobuf.

    Voor kleine integers (<128) gebruikt protobuf varint encoding om
    ruimte te besparen. Wire type 0 = varint.

    Voorbeeld: field 1, value 1
        - Header: (1 << 3) | 0 = 8 = 0x08
        - Value: 1 = 0x01
        - Result: 0x08 0x01

    Args:
        field_number (int): Protobuf field nummer
        value (int): Integer waarde (0 tot 2^32-1)

    Returns:
        bytes: Header + varint waarde
    """
    # Wire type 0 = varint (integers, booleans, enums)
    header = encode_varint((field_number << 3) | 0)

    return header + encode_varint(value)


def encode_fixed32(field_number, value):
    """
    Encode een fixed32 field voor protobuf (altijd 4 bytes, little-endian).

    Fixed32 wordt gebruikt voor waarden die vaak groot zijn (zoals node IDs).
    In tegenstelling tot varint, gebruikt fixed32 altijd precies 4 bytes.
    Wire type 5 = fixed32 (32-bit little-endian).

    Voorbeeld: field 2, value 0xDB2F611C
        - Header: (2 << 3) | 5 = 16 + 5 = 21 = 0x15
        - Value: 0xDB2F611C in little-endian = 0x1C 0x61 0x2F 0xDB
        - Result: 0x15 0x1C 0x61 0x2F 0xDB

    Args:
        field_number (int): Protobuf field nummer
        value (int): 32-bit integer waarde

    Returns:
        bytes: Header (1 byte) + little-endian uint32 (4 bytes)
    """
    # Wire type 5 = fixed32 (always 4 bytes, little-endian)
    header = bytes([(field_number << 3) | 5])

    # Pack als little-endian unsigned int (4 bytes)
    # '<I' = little-endian (<), unsigned int (I)
    return header + struct.pack('<I', value)


# =============================================================================
# MESHTASTIC MESSAGE CONSTRUCTIE
# =============================================================================

def create_text_message(text, dest_id, hop_limit=3):
    """
    Creëer een compleet Meshtastic text message in protobuf formaat.

    De structuur van een Meshtastic bericht is genest:

    Frame (UART):
        ├─ Magic bytes: 0x94 0xC3 0x00 (identificeert Meshtastic frame)
        ├─ Length: varint (lengte van ToRadio payload)
        └─ ToRadio message:
            └─ Field 1 (packet): MeshPacket
                ├─ Field 2 (to): Destination node ID (fixed32)
                ├─ Field 4 (decoded): Data message
                │   ├─ Field 1 (portnum): 1 = TEXT_MESSAGE_APP
                │   └─ Field 2 (payload): De eigenlijke text string
                ├─ Field 9 (hop_limit): Max aantal hops (3)
                └─ Field 11 (want_response): True (wil ACK ontvangen)

    Hex voorbeeld voor {"t": 23.5}:
        94C3                    Frame magic bytes
        00                      Frame protocol version
        21                      Length (33 bytes volgen)
        0A                      ToRadio field 1 (packet), wire type 2
        1F                      MeshPacket length (31 bytes)
        15                      MeshPacket field 2 (to), wire type 5 (fixed32)
        1C612FDB                Destination ID: 0xDB2F611C (little-endian!)
        22                      MeshPacket field 4 (decoded), wire type 2
        0F                      Data length (15 bytes)
        08                      Data field 1 (portnum), wire type 0
        01                      Portnum value: 1 (TEXT_MESSAGE_APP)
        12                      Data field 2 (payload), wire type 2
        0B                      Payload length (11 bytes)
        7B2274223A2032332E357D  Payload: '{"t": 23.5}' in UTF-8
        48                      MeshPacket field 9 (hop_limit), wire type 0
        03                      Hop limit value: 3
        58                      MeshPacket field 11 (want_response), wire type 0
        01                      Want response: true

    Args:
        text (str): Text bericht om te verzenden (meestal JSON string)
        dest_id (int): Destination node ID (bv. 0xDB2F611C)
        hop_limit (int): Maximum aantal keer dat bericht doorgestuurd mag worden (default 3)

    Returns:
        bytes: Volledig geëncodeerd frame klaar om via UART te versturen
    """

    # -------------------------------------------------------------------------
    # STAP 1: Bouw de Data payload (binnenste bericht)
    # -------------------------------------------------------------------------
    # Dit bevat: portnum (welke app) + payload (de text)
    data_payload = bytearray()

    # Field 1: portnum = 1 (TEXT_MESSAGE_APP)
    # Andere portnums: 3=POSITION_APP, 4=NODEINFO_APP, etc.
    data_payload.extend(encode_uint32(1, 1))

    # Field 2: payload = text string
    data_payload.extend(encode_string(2, text))

    # -------------------------------------------------------------------------
    # STAP 2: Bouw het MeshPacket (middelste laag)
    # -------------------------------------------------------------------------
    # Dit bevat: destination, data, routing info
    mesh_packet = bytearray()

    # Field 2: to = destination node ID (fixed32, little-endian!)
    # Waarom fixed32? Node IDs zijn bijna altijd grote getallen, dus
    # varint zou geen ruimte besparen. Fixed32 is ook sneller te parsen.
    mesh_packet.extend(encode_fixed32(2, dest_id))

    # Field 4: decoded = de data payload die we zojuist maakten
    # Wire type 2 omdat het een nested message is (length-delimited)
    mesh_packet.extend(bytes([(4 << 3) | 2]))  # Header: field 4, wire type 2
    mesh_packet.extend(encode_varint(len(data_payload)))  # Length
    mesh_packet.extend(data_payload)  # De eigenlijke data

    # Field 9: hop_limit = max aantal keer dat mesh nodes dit bericht doorsturen
    # Standaard 3 = bericht kan max 3x doorgestuurd worden
    # Te laag: bericht bereikt verre nodes niet
    # Te hoog: onnodige congestie in het netwerk
    mesh_packet.extend(encode_uint32(9, hop_limit))

    # Field 11: want_response = true (we willen een ACK ontvangen)
    # 0x58 = (11 << 3) | 0 = field 11, wire type 0 (varint)
    # 0x01 = true
    mesh_packet.extend(bytes([0x58, 0x01]))

    # -------------------------------------------------------------------------
    # STAP 3: Wrap in ToRadio message (buitenste protobuf laag)
    # -------------------------------------------------------------------------
    # ToRadio is het wrapper bericht voor alle berichten naar de radio
    to_radio = bytearray()

    # Field 1: packet = het MeshPacket dat we net maakten
    # 0x0A = (1 << 3) | 2 = field 1, wire type 2 (length-delimited)
    to_radio.extend(bytes([0x0A]))
    to_radio.extend(encode_varint(len(mesh_packet)))
    to_radio.extend(mesh_packet)

    # -------------------------------------------------------------------------
    # STAP 4: Voeg UART frame header toe
    # -------------------------------------------------------------------------
    # De Meshtastic UART interface verwacht berichten in een specifiek frame:
    # - 0x94 0xC3: Magic bytes (identificatie)
    # - 0x00: Protocol version
    # - Length (varint): hoeveel bytes volgen
    # - Payload: het ToRadio bericht
    frame = bytearray([0x94, 0xC3, 0x00])
    frame.extend(encode_varint(len(to_radio)))
    frame.extend(to_radio)

    return bytes(frame)


# =============================================================================
# UART COMMUNICATIE KLASSE
# =============================================================================

class MeshtasticUART:
    """
    Klasse voor communicatie met Meshtastic module via UART.

    Gebruik:
        # Initialiseer
        mesh = MeshtasticUART(uart_num=2, tx_pin=16, rx_pin=17)

        # Verstuur bericht
        mesh.send_text("Hello mesh!", dest_id=0xDB2F611C)

        # Of verstuur JSON data
        mesh.send_json({"temp": 23.5, "hum": 65}, dest_id=0xDB2F611C)
    """

    def __init__(self, uart_num=2, tx_pin=16, rx_pin=17, baudrate=115200):
        """
        Initialiseer UART verbinding met Meshtastic module.

        Args:
            uart_num (int): UART nummer (1 of 2, afhankelijk van ESP32 board)
            tx_pin (int): GPIO pin voor TX (ESP32 -> Meshtastic RX)
            rx_pin (int): GPIO pin voor RX (ESP32 <- Meshtastic TX)
            baudrate (int): UART baudrate (standaard 115200 voor Meshtastic)
        """
        from machine import UART

        self.uart = UART(uart_num,
                        baudrate=baudrate,
                        bits=8,
                        parity=0,  # Geen parity
                        tx=tx_pin,
                        rx=rx_pin)

        print(f"Meshtastic UART geïnitialiseerd op UART{uart_num}")
        print(f"  TX pin: GPIO{tx_pin}")
        print(f"  RX pin: GPIO{rx_pin}")
        print(f"  Baudrate: {baudrate}")


    def send_text(self, text, dest_id, hop_limit=3, debug=False):
        """
        Verstuur een text bericht naar een Meshtastic node.

        Args:
            text (str): Text om te verzenden
            dest_id (int): Destination node ID (hex, bv. 0xDB2F611C)
            hop_limit (int): Max aantal hops (default 3)
            debug (bool): Print hex output voor debugging

        Returns:
            bool: True als verzenden gelukt is, False bij fout
        """
        try:
            # Creëer protobuf frame
            frame = create_text_message(text, dest_id, hop_limit)

            # Verstuur via UART
            bytes_written = self.uart.write(frame)

            if debug:
                print(f"Verzonden: {text}")
                print(f"Frame ({len(frame)} bytes): {frame.hex().upper()}")
                print(f"Bytes geschreven: {bytes_written}")

            return bytes_written == len(frame)

        except Exception as e:
            print(f"Fout bij verzenden: {e}")
            import sys
            sys.print_exception(e)
            return False


    def send_json(self, data_dict, dest_id, hop_limit=3, debug=False):
        """
        Verstuur een JSON bericht naar een Meshtastic node.

        Args:
            data_dict (dict): Dictionary met data om te verzenden
            dest_id (int): Destination node ID (hex, bv. 0xDB2F611C)
            hop_limit (int): Max aantal hops (default 3)
            debug (bool): Print hex output voor debugging

        Returns:
            bool: True als verzenden gelukt is, False bij fout
        """
        try:
            # Converteer dict naar JSON string
            import ujson
            json_text = ujson.dumps(data_dict)

            # Verstuur als text bericht
            return self.send_text(json_text, dest_id, hop_limit, debug)

        except Exception as e:
            print(f"Fout bij JSON verzenden: {e}")
            import sys
            sys.print_exception(e)
            return False


    def close(self):
        """Sluit de UART verbinding."""
        if self.uart:
            self.uart.deinit()
            print("UART verbinding gesloten")
Main Code
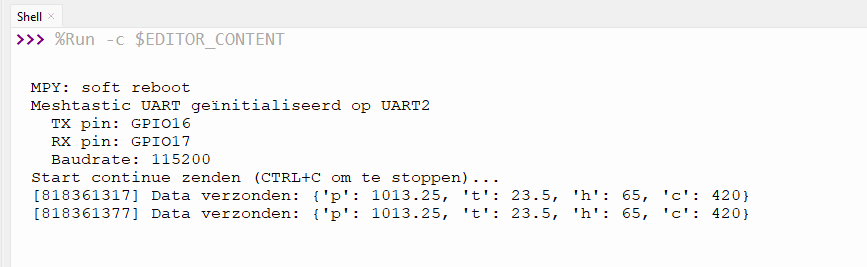
Run the following main code on your ESP32S3 using Thonny IDE. This code initializes the UART communication and sends a JSON test message every 60 seconds to the Meshtastic LoRa module.
"""
Demo: Meshtastic bericht verzenden via UART (MicroPython)
==========================================================

Dit script demonstreert hoe je berichten kunt verzenden naar een Meshtastic
LoRa module via UART vanuit een ESP32S die MicroPython draait.

Hardware setup:
    ESP32S (MicroPython)  <--UART-->  Heltec LoRa (Meshtastic firmware)

    Verbindingen:
    - ESP32S GPIO16 (TX) --> Heltec RX
    - ESP32S GPIO17 (RX) --> Heltec TX
    - ESP32S GND         --> Heltec GND

Gebruik:
    1. Upload meshtastic_uart.py en dit bestand naar je ESP32S
    2. Pas DESTINATION_NODE aan naar jouw ontvanger node ID
    3. Run: import demo_meshtastic_micropython

Auteur: WeerWijs Project
Datum: December 2025
"""

import time
from meshtastic_uart import MeshtasticUART


# =============================================================================
# CONFIGURATIE
# =============================================================================

# Destination node ID (verkrijg via Meshtastic app of CLI)
# Formaat: 8 hex cijfers, bijvoorbeeld !db2f611c in de app = 0xDB2F611C hier
DESTINATION_NODE = 0xDB2F611C

# UART pinnen (pas aan voor jouw ESP32 board indien nodig)
TX_PIN = 16  # ESP32S TX --> Meshtastic RX
RX_PIN = 17  # ESP32S RX <-- Meshtastic TX
UART_NUM = 2  # UART2 (UART0 is vaak voor console)


def main():
    """
    Voorbeeld: Verstuur elke 60 seconden sensor data.
    Gebruik dit als basis voor een weerstation applicatie.
    """
    mesh = MeshtasticUART(
        uart_num=UART_NUM,
        tx_pin=TX_PIN,
        rx_pin=RX_PIN,
        baudrate=115200
    )

    print("Start continue zenden (CTRL+C om te stoppen)...")

    try:
        while True:
            # Simuleer sensor uitlezing (vervang door echte sensoren!)
            data = {
                "t": 23.5,      # Temperatuur in °C
                "h": 65,        # Luchtvochtigheid in %
                "c": 420,       # CO2 in ppm
                "p": 1013.25    # Druk in hPa
            }

            # Verstuur via Meshtastic
            success = mesh.send_json(data, DESTINATION_NODE, debug=False)

            if success:
                print(f"[{time.time()}] Data verzonden: {data}")
            else:
                print(f"[{time.time()}] FOUT bij verzenden!")

            # Wacht 60 seconden voor volgende meting
            time.sleep(60)

    except KeyboardInterrupt:
        print("\nStoppen...")
        mesh.close()

# =============================================================================
# RUN
# =============================================================================

if __name__ == "__main__":
    # Run het hoofdprogramma
    main()
Testing
-
Power on the Heltec LoRa module.
-
Run the main.py script on your ESP32S3 using Thonny IDE.
-
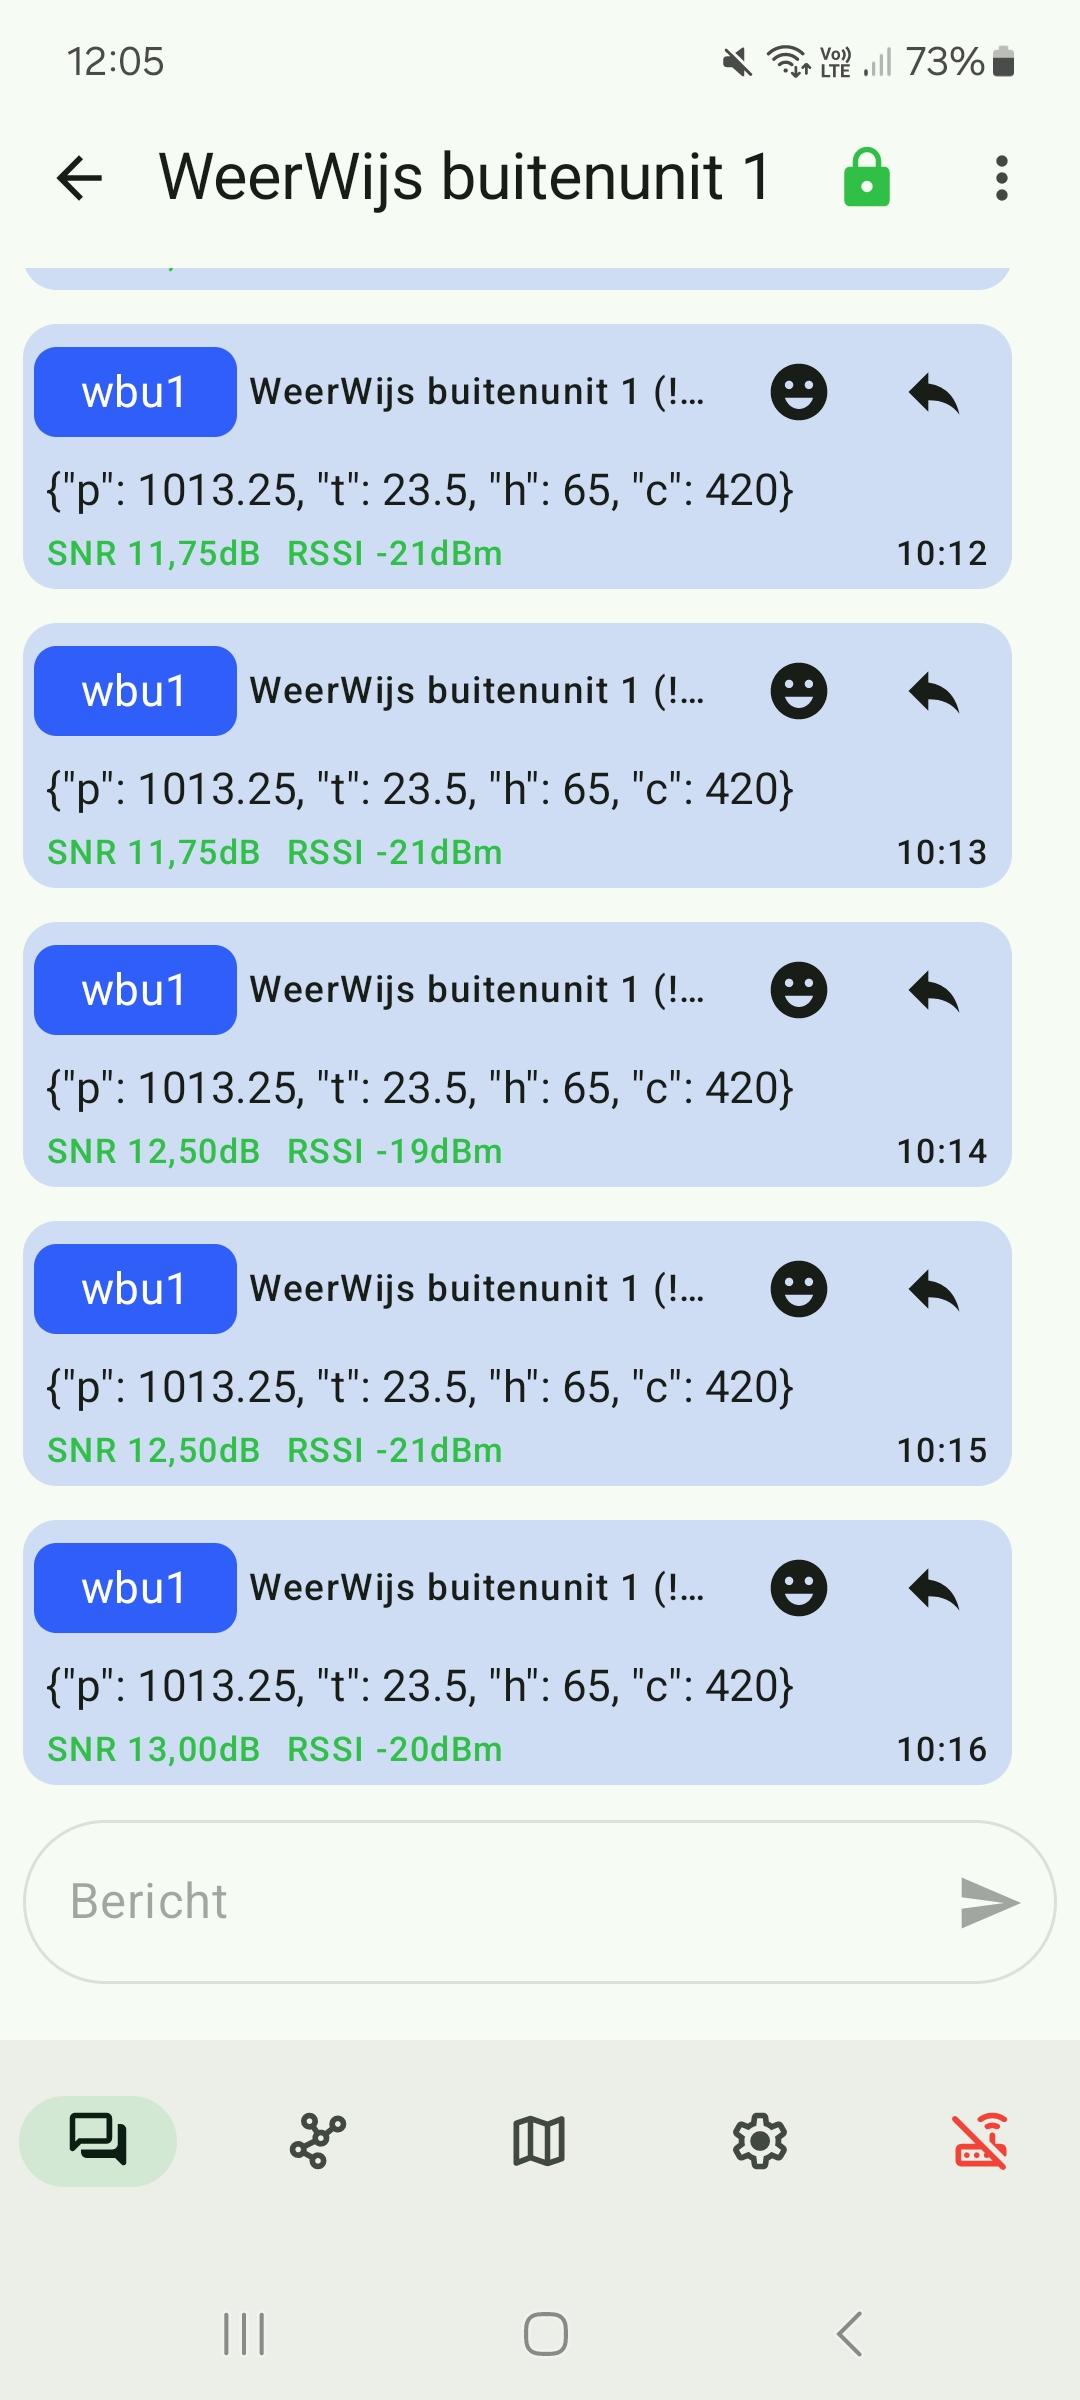
Observe the output in the Thonny shell to see if messages are being sent successfully.
-
Use the Meshtastic app connected to the destination Meshtastic node to verify that the messages are received.