How to configure platformio for ESP32 development
This guide will walk you through the steps to configure PlatformIO in Visual Studio Code to program ESP32 boards in C++.
Requirements
- ESP32 development board (e.g. ESP32-S3)
- Visual Studio Code installed on your computer
- PlatformIO extension installed in Visual Studio Code
Setting up PlatformIO for ESP32
- Open Visual Studio Code.
- Install the PlatformIO extension if you haven't already. You can find it in the Extensions marketplace by searching for "PlatformIO IDE".
- Once PlatformIO is installed, open the PlatformIO Home by clicking on the alien icon in the left sidebar.
- Click on "New Project" to create a new PlatformIO project.
- In the "New Project" dialog, enter a name for your project.
- Search for "Freenove" in the "Board" field and select "Freenove ESP32-S3 WROOM N8R8 (8MB Flash / 8MB PSRAM)".
- Set the "Framework" to "Arduino".
- Choose a location to save your project and click "Finish".
- PlatformIO will create a new project with the necessary configuration files.
- Open the
platformio.inifile in the root of your project and ensure it contains the following configuration:
[env:freenove_esp32_s3_wroom]
platform = espressif32
board = freenove_esp32_s3_wroom
framework = arduino
monitor_speed = 115200
upload_speed = 460800
- Save the
platformio.inifile. - You can now start adding your C++ code in the
srcfolder of your project.
upload port
To upload code to your ESP32 board, you need to specify the correct upload port. You can do this by adding the following line to your platformio.ini file:
upload_port = COM3 ; Replace with your actual port
Replace COM3 with the actual port your ESP32 is connected to. On Linux, it might look like /dev/ttyUSB0 or similar.
If multiple devices are connected, you can instead use the Serial Number of the ESP32 device to specify the upload port. You can find the Serial Number in your system's device manager or in PlatformIO's device list.
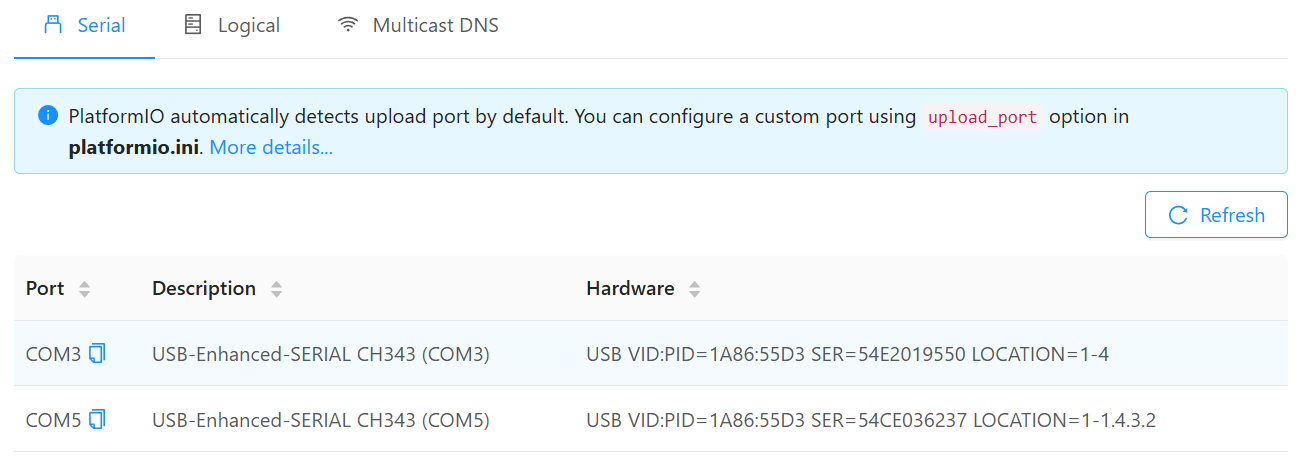
Add the following line to your platformio.ini file, replacing the example Serial Number with your ESP32's Serial Number:
upload_port = hwgrep://SER=54CE036237 ; Replace with your actual port
Testing the setup
Blink Example
To test if your PlatformIO setup is working correctly, you can upload a simple blink example to your ESP32 board:
- Connect your ESP32 board to your computer using a USB cable.
- Open the
src/main.cppfile in your PlatformIO project. - Replace the contents of
main.cppwith a simple blink example:
#include <Arduino.h>
#define LED_PIN 2  // Change this to the correct pin for your board
void setup() {
  pinMode(LED_PIN, OUTPUT);
}
void loop() {
  digitalWrite(LED_PIN, HIGH);
  delay(1000);
  digitalWrite(LED_PIN, LOW);
  delay(1000);
}
- Save the file.
- In a PlatformIO terminal, run the following command to build and upload the code to your ESP32 board:
pio run -t upload
- After the upload is complete, the onboard LED of your ESP32 should start blinking, indicating that the setup is successful.
Serial example
To further test the setup, you can upload a simple serial communication example to your ESP32 board:
- Open the
src/main.cppfile in your PlatformIO project. - Replace the contents of
main.cppwith the following serial example:
#include <Arduino.h>
void setup() {
  Serial.begin(115200);
  Serial.println("ESP32 Serial Communication Test");
}
void loop() {
  Serial.println("Hello from ESP32!");
  delay(2000);
}
- Save the file.
- Add the following line to your
platformio.inifile to set the monitor port:
monitor_port = hwgrep://SER=54CE036237 ; Replace with your actual port
- In a PlatformIO terminal, run the following command to build and upload the code to your ESP32 board:
pio run -t upload
- After the upload is complete, you can open the Serial Monitor to view the output from your ESP32 board.
pio device monitor
- You should see the message "Hello from ESP32!" printed every 2 seconds in the Serial Monitor, indicating that the serial communication is working correctly.
Additional configuration
You can configure a visual studio code workspace with multiple platformio projects for different ESP32 boards. Check out the Visual Studio Code Workspaces documentation for more information on how to set this up.
An example workspace
Here is an example of a Visual Studio Code workspace file that includes multiple PlatformIO projects for different ESP32 projects. You can create a file with the extension .code-workspace and add the following content:
{
  "folders": [
    {
      "path": "C1101_transmitter",
      "name": "🔴 TX - CC1101 Transmitter"
    },
    {
      "path": "C1101_receiver",
      "name": "🔵 RX - CC1101 Receiver"
    },
    {
      "path": "documentation",
      "name": "documentation"
    }
  ],
  "settings": {
    // C/C++ Formatting
    "editor.formatOnSave": true,
    "C_Cpp.formatting": "clangFormat",
    "C_Cpp.clang_format_fallbackStyle": "{ BasedOnStyle: Google, IndentWidth: 2, ColumnLimit: 100 }",
    // PlatformIO
    "platformio-ide.autoRebuildAutocompleteIndex": true,
    "platformio-ide.useBuiltinPIOCore": true,
    // File associations
    "files.associations": {
      "*.h": "cpp",
      "*.cpp": "cpp",
      "*.ino": "cpp"
    }
  },
  // Launch configurations for PlatformIO projects
  "launch": {
    "version": "0.2.0",
    "configurations": [
      {
        "name": "PlatformIO: TX Build & Upload",
        "type": "platformio-debug",
        "request": "launch",
        "cwd": "${workspaceFolder:🔴 TX - CC1101 Transmitter}"
      },
      {
        "name": "PlatformIO: RX Build & Upload",
        "type": "platformio-debug",
        "request": "launch",
        "cwd": "${workspaceFolder:🔵 RX - CC1101 Receiver}"
      }
    ]
  }
}
The folder listing of this workspace assumes you have two PlatformIO projects named C1101_transmitter and C1101_receiver located in the same directory as the workspace file. Below is the folder structure for clarity:
├── C1101_receiver
│   ├── .pio
│   ├── include
│   ├── lib
│   ├── src
│   │   └── main.cpp
|   ├── test
|   └── platformio.ini
├── C1101_transmitter
│   ├── .pio
│   ├── include
│   ├── lib
│   ├── src
│   │   └── main.cpp
|   ├── test
|   └── platformio.ini
├── documentation
│   └── ...
└── CC1101_Workspace.code-workspace