Initiation to MQTT with windows and Mosquitto Broker
Author: @GillisICWE Date: 08-11-2025
This guide will walk you through the steps to set up an MQTT broker using Mosquitto on Windows. An investigate the workflow of publishing and subscribing to topics using an MQTT client.
What is MQTT?
MQTT (Message Queuing Telemetry Transport) is a lightweight messaging protocol designed for low-bandwidth, high-latency, or unreliable networks. It follows a publish-subscribe model, where clients can publish messages to topics and subscribe to topics to receive messages. MQTT is widely used in IoT (Internet of Things) applications due to its efficiency and simplicity.

Download Mosquitto
Download the latest version of Mosquitto for Windows from the official Mosquitto website: Mosquitto Downloads At the time of writing this guide, the latest stable version is [mosquitto-2.0.22-install-windows-x64.exe][https://mosquitto.org/files/binary/win64/mosquitto-2.0.22-install-windows-x64.exe]
Install Mosquitto
- Run the downloaded installer
mosquitto-2.0.22-install-windows-x64.exe. - Follow the installation wizard and choose the default options.
- Once the installation is complete, Mosquitto will be installed in the
C:\Program Files\mosquittodirectory by default. - The Mosquitto broker is now installed as a Windows service and will start automatically, as shown in the image below.

- Add the Mosquitto installation directory to your system's PATH environment variable to easily run Mosquitto commands from any command prompt.
- Right-click on 'This PC' or 'Computer' on the desktop or in File Explorer.
- Select 'Properties' / 'Eigenschappen'.
- Click on 'Advanced system settings' / 'Geavanceerde systeeminstellingen'.
- In the System Properties window, click on the 'Environment Variables' / 'Omgevingsvariabelen' button.
- In the Environment Variables window, find the 'Path' / 'Pad' variable in the 'System variables' / 'Systeemvariabelen' section and select it.
- Click on the 'Edit' / 'Bewerken' button.
- In the Edit Environment Variable window, click on the 'New' button and add the path to the Mosquitto installation directory (e.g.,
C:\Program Files\mosquitto). - Click 'OK' to close all the windows.
Test the Mosquitto Broker
- Open a Windows PowerShell window to test publishing and subscribing to topics.
- Open a second PowerShell window, run the following command to subscribe to a topic (e.g.,
test/topic):
mosquitto_sub -t test/topic
- In the first PowerShell window, run the following command to publish a message to the same topic:
mosquitto_pub -t test/topic -m "Hello MQTT"
- You should see the message "Hello MQTT" appear in the second PowerShell window, indicating that the MQTT broker is functioning correctly.
Debugging
- In the second PowerShell window, you can add the
-dflag to themosquitto_subcommand to enable debug output:
mosquitto_sub -t test/topic -d
- This will provide additional information about the subscription process and any messages received.
- The debug output will show details about the connection, subscription, and message receipt, which can help diagnose any issues with the MQTT broker or client.
Client null sending CONNECT
Client null received CONNACK (0)
Client null sending SUBSCRIBE (Mid: 1, Topic: test/topic, QoS: 0, Options: 0x00)
Client null received SUBACK
Subscribed (mid: 1): 0
Client null received PUBLISH (d0, q0, r0, m0, 'test/topic', ... (10 bytes))
Hello MQTT
Client null sending PINGREQ
Client null received PINGRESP
QoS Levels
MQTT supports three Quality of Service (QoS) levels for message delivery: (What is MQTT Quality of Service (QoS)?)
- QoS 0: At most once delivery. The message is delivered according to the best effort of the underlying network. No acknowledgment is sent by the receiver, and no retry is performed by the sender.
- QoS 1: At least once delivery. The message is guaranteed to be delivered at least once. The sender stores the message until it receives an acknowledgment from the receiver. If no acknowledgment is received, the sender will retry sending the message.
- QoS 2: Exactly once delivery. The message is guaranteed to be delivered exactly once. This is the highest level of service, involving a four-step handshake between the sender and receiver to ensure that the message is neither lost nor duplicated.
When publishing or subscribing to topics using mosquitto_pub and mosquitto_sub, you can specify the desired QoS level using the -q flag followed by the QoS level (0, 1, or 2). For example:
mosquitto_pub -t test/topic -m "Hello MQTT" -q 1
[!NOTE]
MQTT QoS is applied per hop (publisher (sender) → broker (receiver) and broker (sender) → subscriber (receiver)).
Congratulations! You have successfully set up an MQTT broker using Mosquitto on Windows and tested publishing and subscribing to topics.
Proposed Topics
For the WeerWijs project, we can consider the following MQTT topics to organize our data:
Base Topic: go-dynamiek
Subtopics: go-dynamiek/<school>/<location>/<device>
Station Topic: go-dynamiek/campusdetandem/oase41/weerstation1
Sensor Topics: go-dynamiek/campusdetandem/oase41/weerstation1/temperature, go-dynamiek/campusdetandem/oase41/weerstation1/humidity, go-dynamiek/campusdetandem/oase41/weerstation1/pressure, etc.
Specific Topics:
-
go-dynamiek/campusdetandem: For all data related to Campus De Tandem.{
"school_name": "GO! atheneum en leefschool De Tandem",
"address": "Eikelstraat 41, 9900 Eeklo, Belgium",
"website": "https://www.campusdetandem.be",
"phone": "+32 9 377 13 66",
"contact": "info@school.be"
} -
go-dynamiek/campusdetandem/oase41: For general information about the location.{
"location_name": "Oase 41",
"coordinates":
{
"latitude": 51.0543,
"longitude": 3.7174,
"altitude": 25
},
"description": "Campus De Tandem's main location for environmental monitoring."
} -
go-dynamiek/campusdetandem/oase41/weerstation1: For publishing temperature data.{
"Location":
{
"latitude": 51.0543,
"longitude": 3.7174,
"altitude": 25
},
"device_id": "weerstation1",
"metadata":{
"installation_date": "2025-11-01",
"owner": "GO! atheneum en leefschool De Tandem",
"contact": "info@school.be"
},
"status": "active",
"sensors": ["temperature", "humidity", "pressure", "wind_speed", "wind_direction", "rainfall", "uv_index"]
} -
go-dynamiek/campusdetandem/oase41/weerstation1/sensor/temperature: For publishing temperature data.{
"value": 22.5,
"unit": "degC",
"timestamp": "2025-11-08T14:30:00Z",
"status": "ok",
"sensor_id": "temp_sensor_01",
"metadata":
{
"manufacturer": "ASAIR",
"model": "AHT20"
},
"correction_factor": 0.98
} -
go-dynamiek/campusdetandem/oase41/weerstation1/sensor/temperature/value: For publishing only the temperature value.
Configure Firewall
To allow external devices to connect to the Mosquitto broker, you need to configure the Windows Firewall to allow incoming connections on the default MQTT port (1883).
- Open the Windows Defender Firewall settings.
- Click on 'Action' and select 'New Rule...'.
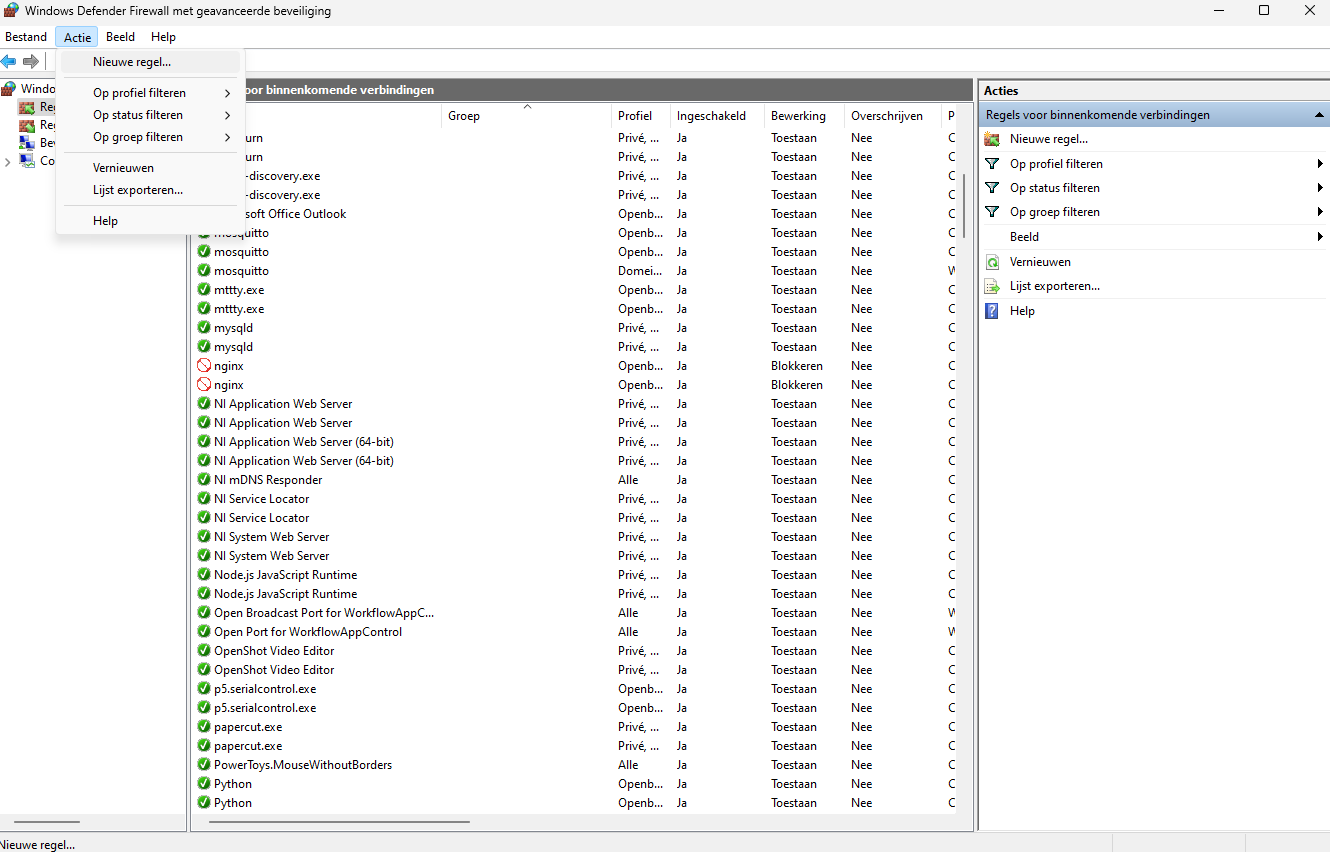
- Select 'Port' and click 'Next'.
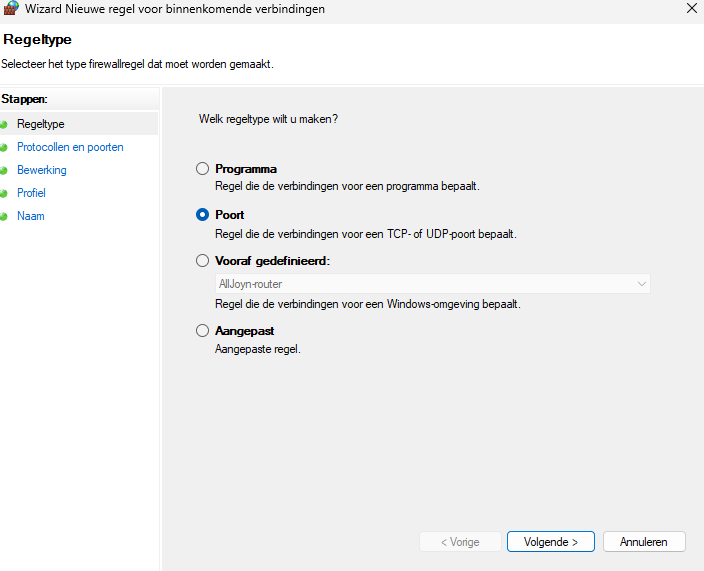
- Select 'TCP' and specify port '1883', then click 'Next'.
- Select 'Allow the connection' and click 'Next'.
- Select the network profiles where you want to allow the connection (Domain, Private, Public) and click 'Next'.
- Give the rule a name (e.g., "Mosquitto MQTT Broker") and click 'Finish'.
Change Mosquitto Configuration
The Mosquitto broker can be configured by editing the mosquitto.conf file located in the Mosquitto installation directory (e.g., C:\Program Files\mosquitto\mosquitto.conf).
- Add authentication (Optional):
To enable username and password authentication, add the following lines to the
mosquitto.conffile:Create a password file using thelistener 1883
allow_anonymous false
password_file C:\Program Files\mosquitto\passwd.txtmosquitto_passwdutility:You will be prompted to enter a password for the specified username.mosquitto_passwd -c C:\Program Files\mosquitto\passwd.txt your_username - Restart the Mosquitto service to apply the changes:
Open a PowerShell window with administrative privileges and run the following commands:
net stop mosquitto
net start mosquitto - With netstat you can check if Mosquitto is listening on the correct port and IP address:
netstat -an | find "1883"
  TCP    0.0.0.0:1883           0.0.0.0:0              LISTENING       5576
  TCP    [::]:1883              [::]:0                 LISTENING       5576
You should see an entry indicating that Mosquitto is listening on port 1883.
[!WARNING] If you see 127.0.0.1:1883, it means Mosquitto is only listening on the localhost interface. Normally you should add
bind_address 0.0.0.0to the configuration file to allow connections from other devices on the network. But on my system this was not necessary and also gave an error to have it in the config file.Opening ipv6 listen socket on port 1883.
1763558396: Opening ipv4 listen socket on port 1883.
1763558396: Opening ipv4 listen socket on port 1883.
1763558396: Error: Elk socketadres (protocol/netwerkadres/poort) kan normaal slechts ÚÚn keer worden gebruikt.
Further video tutorials

References
- What is MQTT Quality of Service (QoS)?. Geraadpleegd op 08 november 2025, van https://www.hivemq.com/blog/mqtt-essentials-part-6-mqtt-quality-of-service-levels/